How to Deactivate Snapchat Account 2023

Deactivate Snapchat Account

We often engage with platforms like Snapchat constantly and unyieldingly in the ever-evolving landscape of social media.

Every now and then, we not only welcome but also find it necessary to pause. Understanding the process becomes essential when you step back and deactivate your Snapchat account.

We seek and reclaim privacy and space in this journey of reclamation.

To deactivate a Snapchat account, follow these steps: 

Open Snapchat’s Account: 

Log in:

Put your username and your password then click Log In. Verification may be required.

Following Steps:

Goto: Account settings
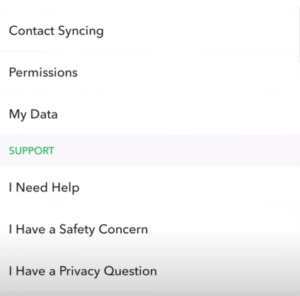
 >Deactivate Snapchat Account


I Need Help>Deactivate Snapchat Account

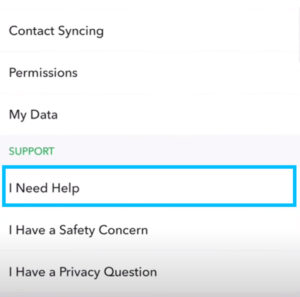
My Account & Security
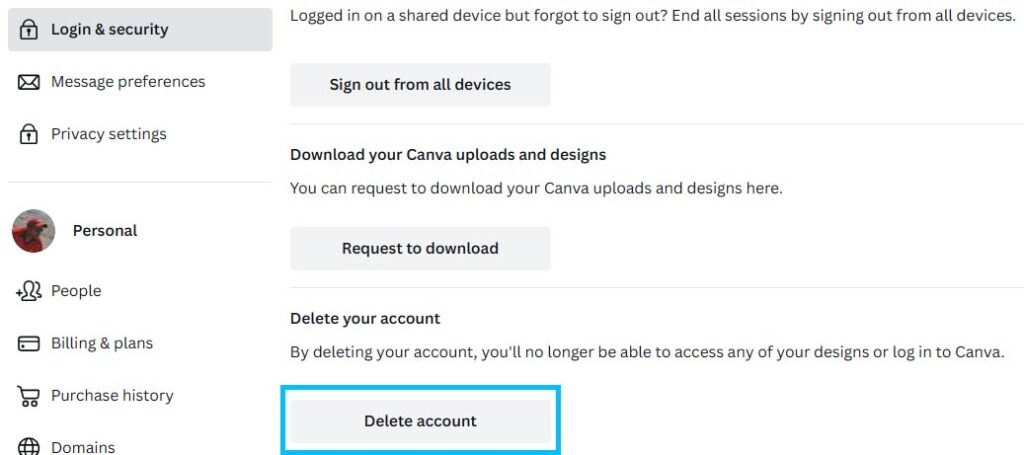
>Deactivate Snapchat Account

Delete My Account>Deactivate Snapchat Account

Accounts Portal>Deactivate Snapchat Account


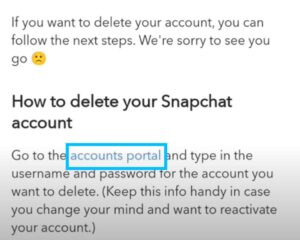
Put your username and your password.
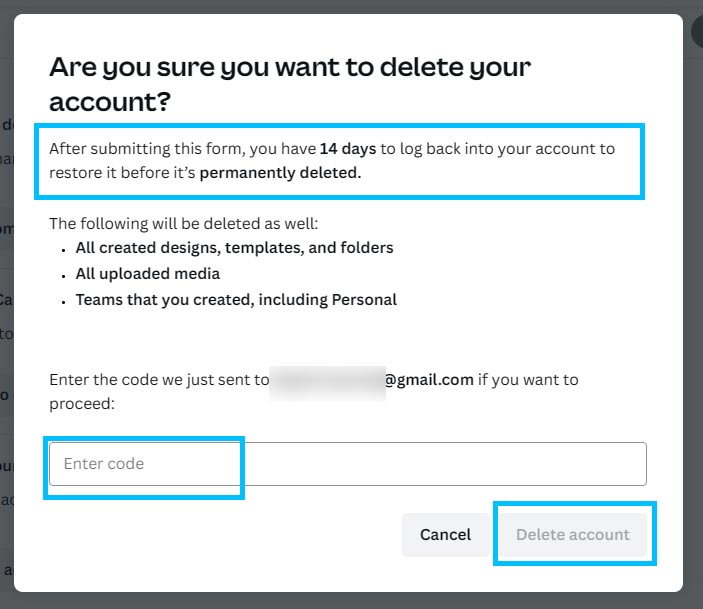
Deactivate Snapchat Account

Click Continue:

Click on the “Continue” button after you enter your password. Your account will be deactivated in a month.

Points of Importance

30 Days Grace Period:

You can reactivate your account by logging back in during this period. But after 30 days, the account will be deleted forever and no data or information will be recoverable.

Snapchat retains some data for a certain period as per their privacy policy, so they do not immediately delete all your information.

Reactivate Your Account

Log In:

Simply log into the Snapchat app with your username and password within the 30-day grace period.

Verify:

You may need to verify your account through SMS or email.

We will restore access:

After verification, your account will reactivate again.

Before Deactivating:

Please save any important data or memories you wish to keep before deactivating your account as you will lose access to them. You have the option to reactivate. If you decide to return to the Snapchat world within those 30 days, reactivating is a breeze. Log into the app, verify your account via SMS or email, and voila – we restore your access.

FAQ

Q1: How long do I need to deactivate a Snapchat account?

A1: The account deactivation process is almost immediate but may take up to 24 hours to complete.

Q2: After deactivating my Snapchat account, can I reactivate it?

A2: Yes, you can. Just log in and verify to your account within 30 days after deactivating, your account will restore again.

Q3: What will happen to my data after the 30-day grace period?

A3: We permanently delete your account and all associated data after 30 days, and they cannot be recovered.

Q4: Can we speed up the permanent deletion process?

A4: Snapchat automatically deletes your account and data after the 30-day grace period. You cannot expedite this process.

Q5: Should I uninstall the Snapchat app after deactivating my account?

A5: It is not necessary. Keep the app on your device, and if you decide to reactivate your account within 30 days, easily do so via the app.

Wrapping up!

Essentially, users empower, secure, and flexibly accentuate their journey by stepping away from Snapchat.

We meticulously craft every step and transition to place control in your hands, ensuring that you author the narrative of your digital engagement.

The ability to deactivate and return underscores commitment and freedom, echoing the nuanced dynamics of today’s digital age in a harmonious blend.


Also Read:

How to Easily Backup and Restore WhatsApp Messages

Novelty Shopper’s Guide: How to Use Instagram Shopping

How to Remove Your Canva Account Perfect Guide

How to find deleted WhatsApp messages

Find Deleted Whatsapp Messages

How to find deleted WhatsApp messages, it can be annoying to figure out how to quickly delete a WhatsApp message, but Android users now have a way to do it.

Android’s built-in Notification History makes it easy to find those mysteriously deleted messages.

Turn on History Notifications:

Take a few simple steps to figure out what happened to your lost messages:

1. On your Android phone or tablet, open Settings.

2. Click on Notifications.

deleted WhatsApp messages

3: Click on Notification History.

deleted WhatsApp messages
4. Turn it on. Now, when you get a notification, your gadget will record it, so you can see old messages.

deleted WhatsApp messages

Check Out Deleted Messages:

Being interested in something didn’t just kill the cat; it added it to the past of notifications:

1. Go back todeleted WhatsApp messages Settings.

deleted WhatsApp messages
2. Click on Notifications once more.

deleted WhatsApp messages
3. Open Notification History to see a list of all the notifications you’ve gotten, even the ones you thought you removed, including those annoying ones.

deleted WhatsApp messages

Please remember the following:

  • The notification log only shows the preview text of notifications, so you may not always see the full deleted message.
  • The log can only hold so many notifications at a time; new ones will replace old ones, so move quickly.
  • Give the sender privacy; if they deleted a message on purpose, that’s what they meant to do.


FAQ:

Q1: Will the Notification History show me the whole text of removed messages?


A1: No, the notice History only shows a look at the message that shows up in the notice bar.

Q2: What is the length of time that messages stay in the Notification History?

A2: It changes because new alerts will make old ones obsolete. Make sure you don’t miss the deleted messages by quickly checking the notification log.

Q3: Does this feature work on all Android phones and tablets?

A3: The availability can change based on the model of gadget and version of Android. For the best experience, always make sure that your device is up to date.

Q4: Can I get back video files that I deleted from WhatsApp?

A4: Not surprisingly, no. The Notification History only saves text from alerts and not audio or video files.

Q5. Is it moral to look at texts that have been deleted?

A5: Privacy must be respected. For a reason, the person who sent the message would delete it. Be aware of other people’s privacy when you use this tool.

 The Notification History tool on Android makes it easier to get back WhatsApp messages that you have deleted. Using a third party is not necessary because the answer works well and doesn’t cause any problems.

As you look into this feature, it is very important to keep other people’s privacy and goals in mind. Keep an eye on updates, as device features can change between Android versions and models. This will help you have the best and safest experience possible as a user.

Also read:

Awesome guide to Creating a Pinterest Business Account

19 Outstanding Digital Products Made in Israel That You May Not Know About

How To Send big file through Gmail in 2023

How to Connect a PS5 Controller to Your Computer (Cable and Bluetooth)

Connect PS5 Controller

The PlayStation 5 (PS5) controller is also known as The DualSense controller. It is a versatile input device that can be used not only with your console but also with your computer and laptop. You are able to connect up your PS5 controller to your computer in two ways: 

  • Cable
  •  Bluetooth.

We will show you both.

How to connect your PS5 controller to your Windows 11 PC!

How to Connect with a USB Cable:

1. Get your PS5 controller and USB cable ready:

Ensure that your PS5 controller is fully charged and get a regular USB Type-C connection cable.

2. Connect the PS5 Controller:

Connect the USB cable one end to the PS5 controller’s USB Type-C port and the other end to the USB port on your Windows 11 PC or laptop.

3. Wait for Windows 11 notification of controller:

Windows should find the PS5 controller on its own. A notification will pop up that A New Device Found. If not, just wait a minute or two, and Windows should finish installing.

4. Test Your Controller:

To make sure the controller is working right open a game or app that accepts game controller settings.

How to Connect with a Bluetooth:

1. Device visibility:

Make your PC discoverable if you want to connect via Bluetooth. Turn the Bluetooth is ON, and your PC or laptop is set to be Discoverable.

Connect PS5 Controller

Go to Settings > Devices > Bluetooth & other devices and turn on “Bluetooth” and “Device visibility.”

Connect PS5 Controller

2. Pair the PS5 controller:

Hold down the “PlayStation” and the “Create” button on top of the controller together until the light starts blinking. The controller’s light bar should begin to flash.

Connect PS5 Controller

3. Connect the controller to your computer:

Connect PS5 Controller

Right click on the Bluetooth settings window and choose “Add a device.” Your PS5 controller should show up on the list. To start the pairing process, click on it.

4. Finish the Pairing:

Connect PS5 Controller

To finish the pairing, follow any on-screen directions. Your computer or laptop will show Connected when the controller finishes the pairing.

Connect PS5 Controller

5. Test Your Controller:

To make sure the controller is working right open a game or app that accepts game controller settings.

It is easy to connect your PS5 controller Windows 11 computer or laptop, whether you use a wired or wireless link. You can play games on your computer with the ease and accuracy of the PS5 controller once everything is set up. Keep in mind that not all games and apps can be used with controllers, so make sure that the ones you want to use are compatible. Have fun with your games!


Read More:

How to Remove Your Canva Account Perfect Guide

Awesome guide to Creating a Pinterest Business Account

19 Outstanding Digital Products Made in Israel That You May Not Know About

Top 10 Mobile Video Editing Apps for Making Beautiful Videos

Mobile Video Editing Apps

On mobile devices, changing videos is now easier to get to and use than ever before. There are many mobile video editing apps to choose from, whether you make content, have a lot of followers on social media, or just want to improve your own movies.

This article will look at 10 of the best mobile video editing apps to help you make a decision.

Adobe Premiere Rush:

Mobile Video Editing Apps

A strong app for editing videos that works like a pro and is easy for anyone to use.

Pros: It has professional tools, an easy-to-use interface, and can sync with your desktop from the cloud.

Cons: You have to pay for premium services.

Rating for the app: 3.9/5

iMovie (iOS):

Mobile Video Editing Apps

iMovie is Apple’s video editing app, and it has a simple interface and powerful editing tools.

Pros: It’s easy to use and has powerful editing tools.

Cons: It only works on Apple products.

Rating for the app: 4.0/5

Kinemaster:  

Mobile Video Editing Apps

Kinemaster lets Android users edit videos with multiple layers and a lot of other features.

Pros: Lots of editing tools and support for multiple layers.

Cons: The free version has a watermark.

Rating for the app: 4.1/5 

PowerDirector:

Mobile Video Editing Apps

PowerDirector is known for making it easy to change timelines and for being able to edit 4K videos.

Pros: It’s easy to change the timeline, and it works with 4K videos.

Cons: The free version has ads inside the app.

Rating for the app: 4.4/5

FilmoraGo:

Mobile Video Editing Apps

An application that is simple to use and has a huge number of sound effects for videos and songs of choice.

Pros: It’s simple to use and has a huge library of effects.

Cons: The free version has a watermark.

Rating for the app: 4.6/5

VivaVideo:

Mobile Video Editing Apps

VivaVideo is well-known for having an easy-to-use design and many effects and filters to choose from. –

Pros: It’s very easy to use, and it has tons of different effects and tools.

Cons: The free version has ads.

Rating for the app: 4.4/5

InShot:

Mobile Video Editing Apps

Excellent for social media video editing, with a variety of tools and effects.

Pros: It’s simple and easy to use, making it ideal for social media.

Cons: The free version has a watermark.

Rating for the app: 4.8/5

Quik by GoPro:

Mobile Video Editing Apps

An app that lets you quickly and automatically edit movies and make beautiful videos for you.

Pros: Freely makes stunning movies on its own.

Cons: There aren’t many ways to change things by hand.

Rating for the app: 4.5/5

LumaFusion (iOS):

Mobile Video Editing Apps

An iOS app for editing videos like a pro, with advanced tools and the ability to edit on multiple tracks at once.

Pros: Editing tools that professionals use.

Cons: It’s only on Apple products.

Rating for the app: 4.8/5

ActionDirector:

Mobile Video Editing Apps

It lets you edit videos in high quality and even in 4K.

Pros: It lets you edit videos well and supports 4K.

Cons: The free version isn’t very good.

Rating for the app: 4.5/5

FAQs

Q1: Please let me know if these apps work on both Android and iOS?

A1: Yes, most of the apps on this list work on both. Some, though, are only available on iOS or Android, so check the app shop to see which ones.

Q2: Are these apps free to use?

A2: A lot of these apps have free versions that have some restrictions or ads on them. You may need to pay a one-time fee or sign up for a subscription to access more advanced tools.

Q3: Which app is best for beginners?

A3: iMovie, InShot, and Quik are all great options for beginners because they have simple editing tools and easy-to-use layouts.

Q4: What app is good for editing videos professionally?

A4: Adobe Premiere Rush, Kinemaster, and LumaFusion are the best apps for people who want to edit videos professionally.

Q5: Can I use these apps to edit 4K movies?

A5: Yes, many of them, like PowerDirector and ActionDirector, can edit 4K videos.

The best mobile video editing app for you will rely on how you want to edit videos, the operating system of your device, and your budget. Now that there are many choices, anyone, no matter how skilled they are, can make great videos right from their phone or tablet.

Also Read:

Awesome guide to Creating a Pinterest Business Account

19 Outstanding Digital Products Made in Israel That You May Not Know About

How To Send big file through Gmail in 2023

How To Send big file through Gmail in 2023

Big File Through Gmail

What You Need to Know to Send big file through Gmail. While Gmail is one of the most popular email clients, there is one thing that you can’t do with attachments that are bigger than 25MB.

How do you send big files then? There are, thankfully, a number of solutions and ways to easily share those large files, videos, or photos.

Allow us to show you how to send big files through Gmail in this guide.

Method 1: Apply Google Drive

You can send big files through Gmail by using Google Drive. It’s easy to do as follows:

Put the file on Google Drive:

  • Utilize your Google account.Big File Through Gmail
  • Press the “+ New” button and pick “File upload.”Big File Through Gmail
  • Pick the big file you need to send.

Start a New Email in Gmail:

  • Open Gmail and hit “Compose” to start a new email.

Link the Google Drive file:Big File Through Gmail

  • In the window where you write your email, click the small triangle-shaped Google Drive icon at the bottom.
  • You can send a file from Google Drive by choosing it and clicking “Insert.”

Send the Email:

  • When you’re done writing your email, click the “Send” button. The person you send the file will get a link to it in Google Drive.

Method 2: Use a service that lets you share files.

There are many file-sharing sites that can help you send big files. A lot of people like Dropbox, OneDrive, and WeTransfer. Here’s how to utilize them:

1. Add the file to the service for sharing files:

  • Either make a new account or sign in to a current one on the service you chose.
  • Put the big file on your account.

2. Get started with a new email in Gmail:Big File Through Gmail

  • Open the app and click “Compose” to begin writing a new message.
  • “Share the Link” means to include the link to the shared file on the file-sharing service in your email.Big File Through Gmail

3. Finally, send the email by finishing it and clicking “Send.”

Method 3: Compress the Folder

If your file is a little bigger than Gmail’s limit, you might want to make a ZIP file out of it:

Compress the File:

  • Right-click the file you want to send on your computer and choose “Compress.” On a Windows computer, choose “Compressed (zipped) folder” from the “Send to” menu.Big File Through Gmail

Adding the Compressed File:

  • Just like any other document, add the compressed ZIP file to your Gmail message.

Send the Email

  • When you’re done writing your email, click “Send.”

Method 4: Use add-ons for Gmail:

Many third-party add-ons for Gmail can be used to send big files. Here’s how to utilize them:

1. Check out Gmail add-ons:

To do this, go to the Google Workspace Marketplace and look for “MailBigFile” or “Dropbox for Gmail.Big File Through Gmail

2. Install the Add-On:

Use this step to add the add-on you want. Follow the directions given.

3. Attach big Files:

After installing the add-on, you can use it to send and attach big files from Gmail.

Method 5: Use a File-Splitting Tools

You might need to use a file-splitting tool to make your file smaller if it’s much bigger than Gmail’s limit. For example:

Split the File:

Use a tool that splits files to break up the big file into smaller pieces that you can handle.

Send the Parts:

Put each smaller part in a different email and send it.

Okay, that’s all of it! There are now more than one way to send Big File Through Gmail. Pick the right one for your wants, and then it will be easy to share your novelty content.

Services and features may change over time, so make sure you know what the newest Gmail choices are for sending large files. It’s common to need to send big files through Gmail, and this guide gives you a number of effective ways to do that.


Another helpful guide:

How to Remove Your Canva Account Perfect Guide

Awesome guide to Creating a Pinterest Business Account

19 Outstanding Digital Products Made in Israel That You May Not Know About

19 Outstanding Digital Products Made in Israel That You May Not Know About

FROM ISRAIL

Israeli Digital Products Outstanding. Israel, frequently referred to as the “Startup Nation,” has a thriving technical sector.

It is a center for innovation and is home to numerous tech businesses that have achieved great success in international markets.

However, few are aware that some of these much-praised digital goods have their roots in Israel.

In this post, we present 19 widely used digital products that originated in Israel and have assimilated into our daily life.

The Outstanding Israeli Digital Products

Waze:

Digital Products

A straightforward navigation tool that is well-liked for its real-time traffic updates taken from the data of millions of users worldwide, ensuring the quickest path to your location.

Mobileye:

Digital Products

Mobileye’s cutting-edge technology is guiding us toward a future of self-driving cars by pioneering the field of autonomous driving.

Viber:

Digital Products

A messaging app with a stellar reputation that offers end-to-end encryption and seamless communication for text, calls, and media sharing.

Playtika:

Digital Products

Playtika enters the world of online gaming and captivates players with fun, mobile games with a casino atmosphere.

CyberArk:

Digital Products

A stronghold of online security that protects businesses against ominous developments in cyber-attacks that target privileged accounts.

Fiverr:

Digital Products

A digital marketplace that has transformed the freelance industry by providing a venue for clients and talent to connect and work together.

Gett:

Digital Products

A ride-hailing app that offers quality, convenience, and business transportation services on demand.

Taboola:

Digital Products

Taboola’s platform makes individualized content recommendations to keep users interested, improving the content discovery experience.

Outbrain:

Digital Products

It changes how publishers and viewers connect by giving curated content recommendations, much like Taboola.

NoorCam:

Digital Products

A companion for those who are blind that uses AI to read words and recognize objects to make the world more accessible.

SodaStream:

Digital Products

SodaStream With effective e-commerce and online marketing methods, it succeeds in digital domains in addition to its well-known carbonation products.

IronSource:

Digital Products

A platform that caters to app developers and turns apps into successful economic operations.

Wix:

Digital Products

Providing easy-to-use website construction tools that enable millions of people to have a distinctive online presence.

WalkMe:

Digital Products

Using WalkMe an aid for navigating through complicated websites that improves user experience and engagement.

Any.DO:

Digital Products

Any.do is a personal assistant that manages tasks and schedules in the cloud to increase productivity.

Moovit:

Digital Products

Moovit is a thorough resource that provides real-time information and guidance for people using public transportation.

MyHeritage:

Digital Products

MyHeritage helps customers discover their ancestry through family trees and DNA testing, bridging generations.

Applovin:

Digital ProductsMonitoring and evaluating mobile SDKs to provide the best security and performance for app developers. Twenty.

Check Point Software Technologies:

Digital Products

Check Point Software Technologies Offering complete defense against a wide range of digital threats, cybersecurity stands as a guardian.

The nation of Israel has made significant and widespread contributions to the global digital environment.

Even though they originated in Israel, these innovations have crossed national boundaries to become essential parts of our digital existence, frequently without the general user being aware of their origins.

Each product highlights Israel’s crucial role in determining the direction of technology, from strengthening digital security to facilitating networking. It’s fascinating to think of the upcoming wave of Israeli technological marvels that will slickly integrate into our daily lives and make the globe more connected, accessible, and secure. The “Startup Nation” is still a hotbed of creativity.


Another helpful guide:

Novelty Shopper’s Guide: How to Use Instagram Shopping

How to Remove Your Canva Account Perfect Guide

Awesome guide to Creating a Pinterest Business Account

Awesome guide to Creating a Pinterest Business Account

Pinterest Business

For businesses, entrepreneurs, and brands wishing to broaden their online presence, raise awareness, and engage their target audience, a Pinterest business account is a crucial tool.

Business accounts on Pinterest offer access to Pinterest Analytics, advertisements, and other business-related features in contrast to personal accounts.

Creating a Pinterest account for your business is explained in detail here.

Creating a New Business Account is Option

Go to Pinterest Business:

Check out the Pinterest Business website.

Join Now:

Select “Sign up” from the menu.

Select the type of business:

Choose “Create a business account.” After registering with a personal account, you can also have the choice to create a business account.

Pinterest Business

Fill out this form:

Your email address, password, and age must be entered before clicking “Continue.” As an alternative, you may create an account using Google or Facebook.

Put your business information:

Choose business category, enter your company name, and click “Next.

Pinterest Business

Link to Additional Platforms (Optional):

If necessary, link up with additional social networking sites like YouTube, Etsy, or Instagram. Press “Next.

Pinterest Business

Configure an Ad Account (Optional):

Make a decision regarding running advertising on Pinterest. The necessary information must be entered, otherwise move on.

Complete setup:

After selecting your interests during setup, your business account will be prepared.

Change From a personal account to a business account!

Sign into your individual account:

Log in to your current Pinterest account for personal use.

Settings:

Pinterest Business

Choose “Settings” from the menu in the top right corner. which is three dots. Account alterations from the menu on the left, choose “Account settings“.

Pinterest Business

Transform Account:

Pinterest Business

Find the “Convert account” option by scrolling down. Then select “Convert to Business Account.

Pinterest Business

Add business details:

Enter the necessary business data, including the type of business, website, and other information.

Pinterest Business

Save Settings:

Your personal account will now be transformed into a business account after you save your settings.

Additional Advice

  • Profile Enhancement By including your company’s logo, description, and contact details, you can personalize your page.
  • Create boards and start pinning articles related to your industry on Pinterest. To make your pins discoverable, use SEO tactics.
  • Analytics: Track the effectiveness of your pins and boards with Pinterest Analytics and adjust your strategy as necessary.

FAQ

Q1. My personal Pinterest account can I make it into a corporate account?

A1: From your profile’s settings section, you may quickly change your personal account into a business account. Your boards and pins will all be saved.

Q2. What advantages can company Pinterest accounts offer?

A2: Business accounts get extra features including analytics to monitor performance and engagement, advertisements to advertise pins, a business profile, and Rich Pins to give pins more context.

Q3: Does setting up a business Pinterest account cost money?

A3: It’s free! There will be expenses involved if you decide to use paid promotions to attract a larger audience.

Q4: How can I validate my company’s Pinterest page?

A4: Navigate to your profile settings and select “Claim Website.” Observe the directions to validate your website. A meta tag or HTML file upload to your website is usually required.

Q5: Is it possible to use Pinterest for both personal and professional purposes?

A5: You can have both in fact. You have two options: either turn your personal account into a business account or keep your personal account while opening a new one.


Establishing a business, the setup of a Pinterest account is simple and comes with a number of advantages for companies wishing to use the platform’s large audience for engagement and marketing. To create your company account and begin pinning to improve your online presence, simply follow the steps indicated above. You can check out Pinterest’s official help section or get in touch with their support staff for further information.


Another helpful guides:

How to Easily Backup and Restore WhatsApp Messages

Novelty Shopper’s Guide: How to Use Instagram Shopping

How to Remove Your Canva Account Perfect Guide

How to Remove Your Canva Account Perfect Guide

Canva Account

You might eventually decide to cancel your Canva account for a variety of reasons.

This might be done because of privacy issues, a desire to purge clutter from your digital life, or just because you are no longer in need of their services.

Step-by-Step Instructions: 

Sign in to your Canva account: 

Go to canva.com, Sign in your Canva account. 

Access the Account Settings:

By clicking Choose ‘Account settings‘ icon on the top right.

Canva Account Account Deactivation: 

In the left sidebar, select the ‘Login & security‘ tab. 

Locate the “Deactivate Account” option by scrolling down. – To confirm deactivation, click on it and adhere to the on-screen instructions.Canva Account

Confirm Deactivation:

You could be prompted for your reason for departing. Select the best choice, then carry on. – If prompted, confirm your password. 

Canva Account

Account Deletion:

Contact Canva’s customer service team to ask for your account to be completely deleted after it has been deactivated.

Canva Account

Important Points to Keep in Mind:

All of your designs, folders, and other data will be deleted if you delete your Canva account.

Before continuing, take sure to download and save your work elsewhere.

The deletion of the account cannot be reversed. You cannot get your account or data back once it has been removed.

FAQ: 

Q1: Is it possible for me to temporarily cancel my Canva account? 

A1: You can temporarily deactivate your Canva account. Up until step 3, adhere to the instructions in the aforementioned article. Your account will be made inactive, but you can always log back in to make it active again. 

Q2: What transpires to my designs if I delete my Canva account? 

A2: Canva will permanently remove all of your creations and data. Make sure you have downloaded or made a backup of your designs before starting the deleting procedure.

Q3: Can I get my Canva account back after it was deleted?

A3: No, your Canva account cannot be restored after it has been deleted. Before doing this irrevocable step, be sure you’re certain. 

Q4: Is it possible to remove my account without getting in touch with customer service?

A4: At the moment, after cancelling your account, you must get in touch with Canva’s customer care to ensure the total deletion of your account and data. 

Q5: How long does it take Canva to remove my account? 

A5: The processing time varies, but in general Canva responds to your request within a few days. For more information, it is preferable to contact their support team.

You must first deactivate your Canva account through your settings before contacting the support team to have it completely deleted. Before beginning this process, make sure you back up all critical data and designs because deletion is both irreversible and permanent. Always give your demands and available options great thought before acting. Contact Canva’s customer service department directly or visit their official help center for additional guidance.


Another helpful guide:

Exploring the Top 10 Web Browsers and Their Unique Features

How to Easily Backup and Restore WhatsApp Messages

Novelty Shopper’s Guide: How to Use Instagram Shopping

Novelty Shopper’s Guide: How to Use Instagram Shopping

Instagram Shopping

How to Use Instagram Shopping” Starting off: Instagram is no longer just a place to share photos and videos; it’s now a thriving market where people can find and buy goods from their favorite brands.

Instagram Shopping

Instagram Shopping is the function that enables all of this.

Step-by-step instructions on using Instagram shopping feature are provided here. 

access your Instagram account by opening the app. 

Press the three lines in the upper right corner and choose “Settings.” 

Press “Business.” 

Look for “Shopping.” Instagram Shopping

To join your Facebook page and set up your product catalog, 

follow the steps shown on the screen. This might need to be done with Facebook’s Commerce Manager. 

A Step-by-Step Guide to Using Instagram Shopping Step 

Look for posts that can be bought. 

  1. Look through your Instagram page. 
  2. Find posts that have a shopping bag in the upper right spot. These posts can be bought. Instagram Shopping

Click on a post that can be bought. Instagram Shopping

  1. Click on the shoppable post that you want to see more of. 
  2. The post will have product tags on it.

Look at the product tags. Instagram Shopping

  1. Tap on a product tag to see information and the price. 
  2. You can look at more pictures, read more about the item, and click the “Shop Now” button. 

Click “Shop Now” 

  1. If you’re ready to buy, click “Shop Now” to go to the product page on the seller’s site. 
  2. Finish the purchase the same way you would on the seller’s website. 


FAQ

Q: Can I save items to look at later in Instagram Shopping?

A: You can’t make a request on Instagram, but you can use the “Save” button to come back to a post later. 

Q: Can I shop on Instagram in my country?

A: Instagram Shopping is expanding to more places, so check to see if it works where you are.


Instagram Shopping lets you find and buy products from your favorite brands without leaving the app. As this feature keeps getting better, more companies are starting to use it to make shopping easier for their customers. So start shopping from your Instagram feed!


Also for you:

5 Easy ways for Navigating the Digital Ad Landscape with Meta Ad Manager

Exploring the Top 10 Web Browsers and Their Unique Features

How to Easily Backup and Restore WhatsApp Messages

How to Easily Backup and Restore WhatsApp Messages

Backup and Restore WhatsApp

Here The easiest way to backup and restore WhatsApp Messages!

WhatsApp has become an integral part of our daily communication, and the thought of losing precious chat history can be a nightmare.

Fortunately, WhatsApp offers convenient ways to backup and restore your messages.

Backup and Restore WhatsApp

In this article, we will guide you through the process with step-by-step instructions and valuable tips to ensure your conversations are safe and sound.

Why Backup and Restore WhatsApp Messages:

Backing up your WhatsApp messages serves various purposes. It allows you to:

– Restore data when Changing to a new phone.

– Retrieve important information if you accidentally delete a chat.

– Safeguard your memories, photos, and documents shared through chats.

How to Backup WhatsApp Messages

Local Backup:

By default, WhatsApp automatically backs up your chats and media to your phone’s local storage.

 Google Drive Backup:

Backup and Restore WhatsApp
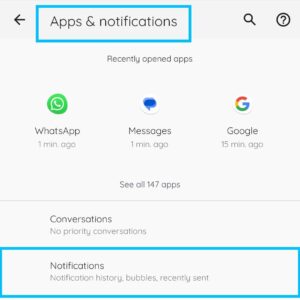
To enable cloud backup, go to WhatsApp Settings > Chats > Chat backup, and select your Google account.

You can set up automatic backups and choose the frequency. How to Restore WhatsApp Messages

Local Restore:

If you’re reinstalling WhatsApp on the same phone, the app will prompt you to restore your chat history during setup.

Backup and Restore WhatsAppNew Phone Restore:

When switching to a new phone, make sure you’re using the same phone number and Google account for cloud backup. Install WhatsApp on the new device and confirm your phone number. WhatsApp will detect the backup in Google Drive and prompt you to restore.

Manual Restore:

If you want to restore chats from a local backup, locate the backup file in your phone’s storage (usually in the WhatsApp/Databases folder) and rename it. Then, uninstall and reinstall WhatsApp. During setup, choose “Restore” when prompted.

Tips for a Smooth Experience:

1. Regular Backups: Set up automated backups to Google Drive to ensure your chats are always up to date.

2. Sufficient Storage: Ensure your phone has enough storage space for both local and cloud backups.

3. Connect to Wi-Fi: Use Wi-Fi for backup and restore processes to save data and ensure faster transfers.

4. Check Backup Date: Before restoring, confirm the date of the last backup to ensure it includes the latest chats.

Frequently Asked Questions

Q1: How often does WhatsApp backup my messages?

A: WhatsApp creates an automatic daily backup. You can customize this in the settings.

Q2: Can I restore messages from a different phone number?

A: You can’t restore messages from a different phone number, but you can change your number within WhatsApp.

Q3: What if I want to restore older messages from a backup?

A: No, WhatsApp doesn’t have a built-in way to back up your phone conversations.

Q4: Can I backup WhatsApp messages to my computer?

A: WhatsApp doesn’t offer a direct computer backup solution, but you can use third-party software to achieve this.

Regular backups and a proactive approach ensure that your conversations, photos, and videos are secure and easily recoverable, providing peace of mind in the world of digital communication.


Also Read:

30 Practical Google Chrome Extensions: A Mix of Free and Paid 

5 Easy ways for Navigating the Digital Ad Landscape with Meta Ad Manager

Exploring the Top 10 Web Browsers and Their Unique Features